
Building the Western Digital vSAN Performance Testbed
In my blog titled “Definitive Best Practices: Inside Western Digital’s vSAN Performance Testbed” I gave a brief introduction to the VMware vSAN performance testbed, describing why we had built it, and the evolution of the baseline performance numbers. Here I would like to explain further how the cluster was actually configured so you can easily (relatively speaking) emulate my work.
In this blog, I’ll discuss simple vSphere post-install tasks, network configuration details, and finally building the vSAN cluster. This will all be done on my baseline configuration.
I will not be covering in detail how to install ESXi, how to setup and deploy a vCenter Server, or how to configure a vSphere distributed switch. Instead, I will discuss the design principles and steps for properly configuring the vSAN performance testbed.
Prerequisites
The following services should be available for ease of deployment:
- Windows Based vCenter Server Version 6.5 Build 4564107 (or vCenter Server Appliance)
- ESXi Version 6.5 Build 4564106
- Domain Controller
- DHCP
- DNS
vSphere Post-Install Tasks
In my test environments, I usually follow some basic configuration standards. These are not all required (or recommended) for production clusters, but each configuration choice should be well-thought-out. As the Data Propulsion LabsTM (DPLTM) is constantly deploying test clusters for one reason or another, I took a moment to script these post-install tasks in PowerCLI to save time. That being said, look at the VMware Host Profiles, as they can be a time saver as well.
All scripted parts assume that hosts have already been added to vCenter Server. My full script does the following things:
- Adds hosts to the vCenter server based on original IP address
- Performs post-install tasks
- Inserts DHCP reservations and DNS records
- Configures a temporary VMKernel adapter with a temporary IP address
- Removes hosts and re-adds hosts to vCenter Server with a temporary IP address
- Modifies and resets the primary VMKernel adapter
- Removes hosts and re-adds hosts with Fully Qualified Domain Names (FQDNs)
As that is quite a list, I’ll leave the subject of scripting deployment tasks to another full blog. I’m including some PowerCLI excerpts in this blog, to help wet the scripting wizard’s whistle.
Basic Networking
As not all my testing requires vSphere distributed switches, my script first configures basic networking.
- I ensured the appropriate vmnic was selected for management network traffic. In this case, all traffic in the cluster will be run off the Mellanox ConnectX-3 Pro Host Channel Adapters, so I selected vmnic4.
- As I’m a minimalist and prefer to avoid potential networking headaches, I disabled IPv6 on the hosts (this requires a reboot). Scripted:
$vhost = Get-VMHost -Name $name
$vhost | Get-VMHostNetwork | Set-VMHostNetwork -IPv6Enabled $false -confirm:$false- In order to reduce network CPU overhead and increase network performance, I set Jumbo Frames, or an MTU of 9000. Scripted:
$vmk = Get-VMHostNetworkAdapter -VMHost $vhost | where IP -like $CurrentIP
Set-VMHostNetworkAdapter -VirtualNic $vmk -Mtu 9000 -Confirm:$false
Basic Post-Install Tasks
- As all my environments are test environments, I find it easier not to harden my ESXi security, so I have enabled and started Tech Support Mode (test environment only). Scripted:
Set-VMHostService -HostService ($vhost | Get-VMHostService | Where { $_.Key -eq “TSM”} ) -Policy Automatic
Start-VMHostService -HostService ($vhost | Get-VMHostService | Where { $_.Key -eq “TSM”})- I enabled and started SSH. Scripted:
Set-VMHostService -HostService ($vhost | Get-VMHostService | Where { $_.Key -eq “TSM-SSH”} ) -Policy Automatic
Start-VMHostService -HostService ($vhost | Get-VMHostService | Where { $_.Key -eq “TSM-SSH”} )- In order to keep my hosts time in sync, I enabled, configured, and started the Network Time Protocol Daemon. Scripted:
Set-VMHostService -HostService ($vhost | Get-VMHostService | Where { $_.Key -eq “ntpd”} ) -Policy Automatic
Add-VMHostNtpServer -NtpServer “0.pool.ntp.org” -VMHost $vhost
Start-VMHostService -HostService ($vhost | Get-VMHostService | Where { $_.Key -eq “ntpd”})- I like a clean environment. Hence, I enabled the TSM and TSM-SSH and suppressed TSM and SSH warnings (test environments only). Scripted:
Get-AdvancedSetting -Entity $vhost.name | Where {$_.Name -eq "UserVars.SuppressShellWarning"} | Set-AdvancedSetting -Value "1" -Confirm:$false- To ensure no additional latency is introduced from processors changing power state, I set the Power Management “Active Policy” to “High Performance”. Scripted:
view = $vhost | Get-View
(Get-View $view.ConfigManager.PowerSystem).ConfigurePowerPolicy(1)- I renamed “local” datastore to avoid the “datastore1”, “datastore1 (1)”, datastore1 (2)” mess. Scripted:
$datastores = $null
$datastores = $vhost | Get-Datastore -Name "datastore1*"
if(!($datastores -eq $null))
{
foreach ($datastore in $datastores)
{
$dsname = $Hostname + "-" + $([MATH]::round($datastore.CapacityGB,0)) + "-" + $(if(($datastore | get-scsilun).ExtensionData.ssd){"SSD"}else{ "Disk"})
$newdsname = $dsname
$tag = 1
while(Get-Datastore -Name $newdsname -ErrorAction Ignore)
{
$newdsname = $dsname + "-" + $tag
$tag++
}
Write-host "Detected default datastore name: $($datastore.Name) - Renaming to: $newdsname"
$datastore | Set-Datastore -Name $newdsname
}
}
vSphere Distributed Switch Configuration
I chose to implement a vSphere Distributed Switch (VDS) as it would allow for a finer-grain control over vSAN traffic, as well as ensuring performance during periods of contention with vSphere Network I/O Control (NIOC).
VDS Settings
- VDS Version 6.5.0
- MTU 9000
- Health Check: Enabled
VLANs
Because I was running all traffic through a single switch and implementing a VDS, I needed to deploy VLANs.
- VLAN 3: vSAN
- VLAN 4: vMotion
- VLAN 152: Management and Virtual Machine traffic
Uplinks
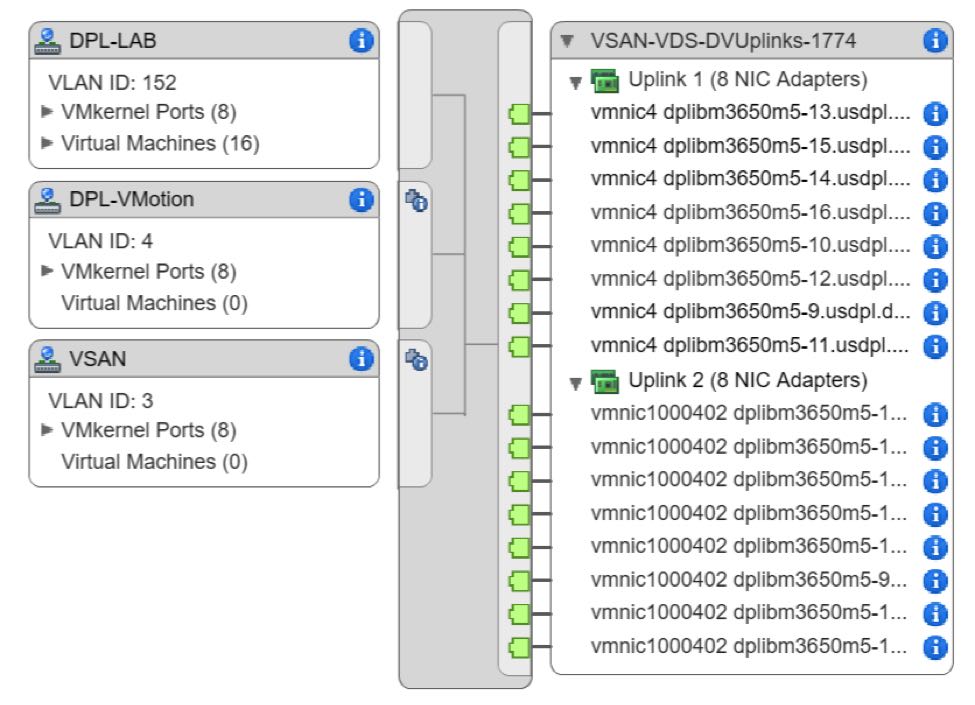
Eliminating a potential bottleneck with 56Gb Ethernet allowed me to simplify my network configuration. The Mellanox ConnectX-3 Pro adapters I used were dual-port. With only one adapter per host, I only had to configure 2 uplinks to my VDS.
- Uplinks: 2
- Uplink 1: vmnic4
- Uplink 2: vmnic1000402
Port Groups
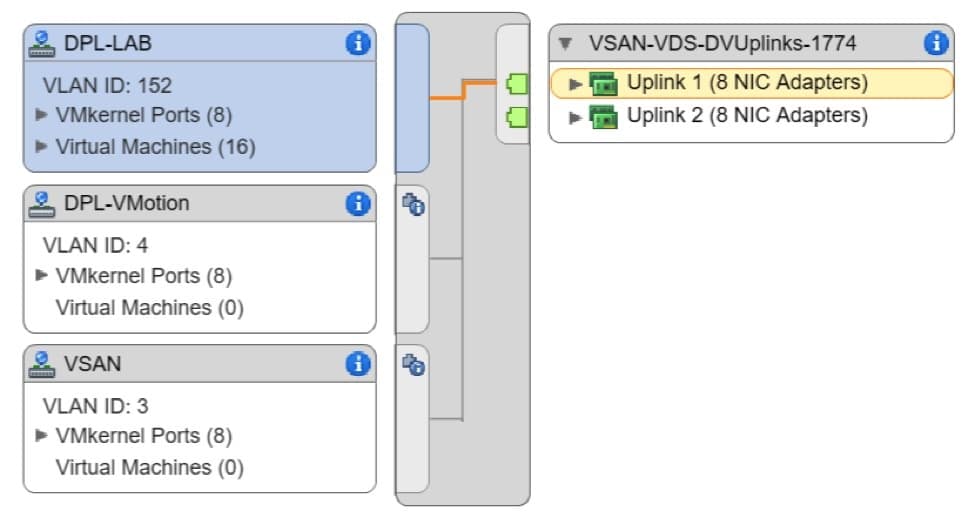
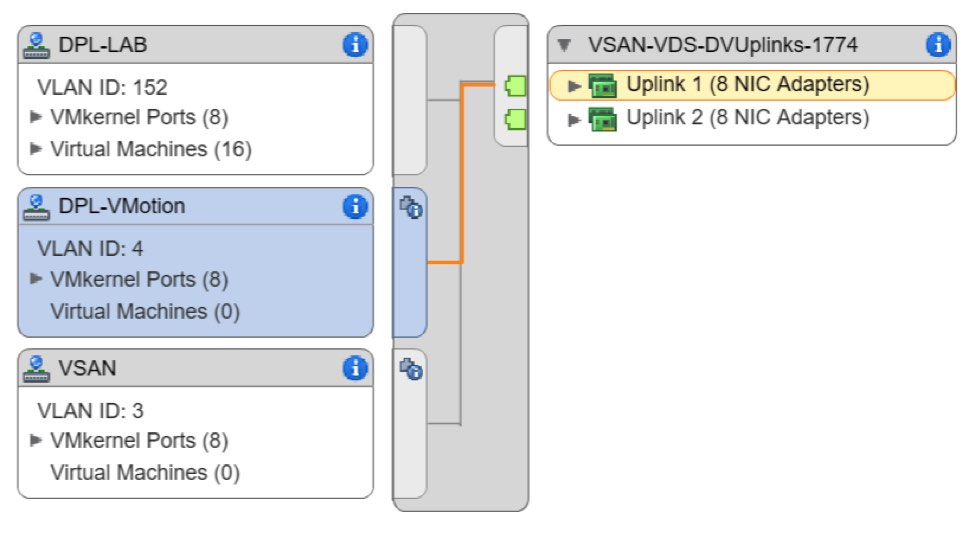
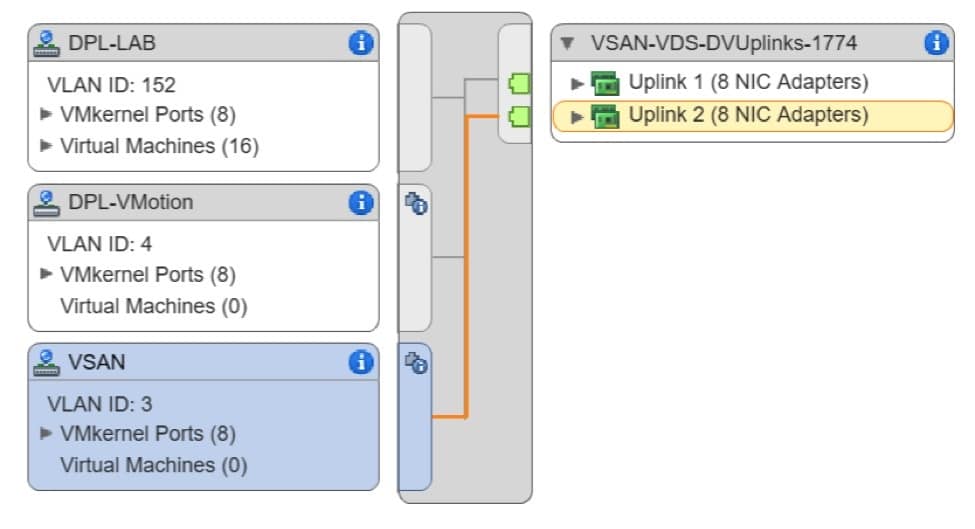
Pay particular attention to the “Teaming and Failover” configuration of each port group. It is essential, when possible, to isolate the vSAN traffic to its own uplink port. The highlighted route in each screen shot below shows the active uplink per port group.
- DPL-Lab: VLAN 152
- Active Uplink: 1
- Passive Uplink: 2
- DPL-VMotion: VLAN 4
- Active Uplink: 1
- Passive Uplink: 2
- VSAN: VLAN 3
- Active Uplink: 2
- Passive Uplink: 1
vSAN Configuration
This part was relatively simple, using the web client.
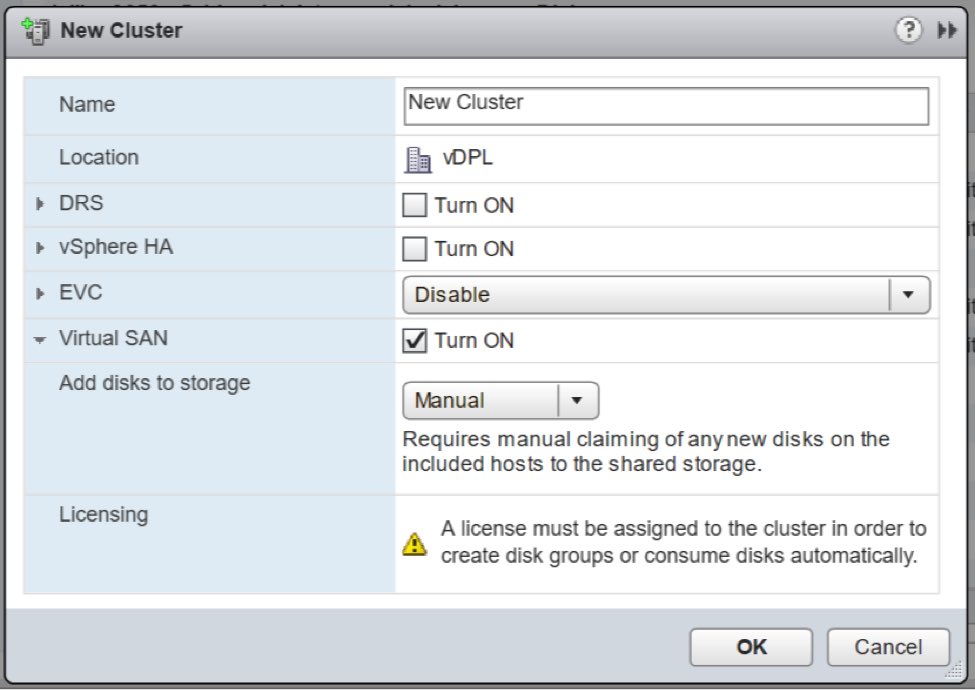
- During cluster creation, I selected the “Turn ON” checkbox for Virtual SAN, and selected “Manual” for the “Add disks to storage” drop-down list.
- I added hosts to the cluster through a simple drag and drop.
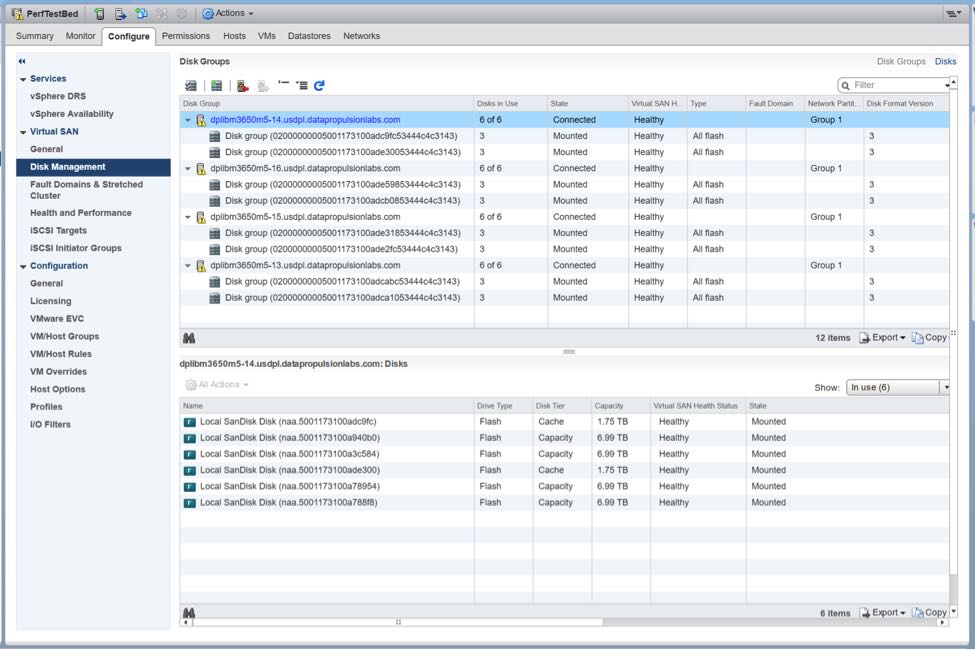
- For disk groups, in this first cluster, I used the 12Gb/s SAS SSDs from the HGST UltrastarTM SS200 family, which have been certified for use for both caching tier and capacity tier within vSAN. This drive’s family is targeted for mixed-use and read-intensive applications with high-endurance and high-capacity options. This particular SSD family also offers great price/performance metrics that align quite well with vSAN capabilities. I created (2) disk groups per node via Cluster -> Configure -> Virtual SAN -> Disk Management as follows:
- Caching: (1) 1.92TB HGST Ultrastar SS200: SDLL1CLR-020T-CCA1
- Capacity: (2) 7.68TB HGST Ultrastar SS200: SDLL1HLR-076T-CCA1
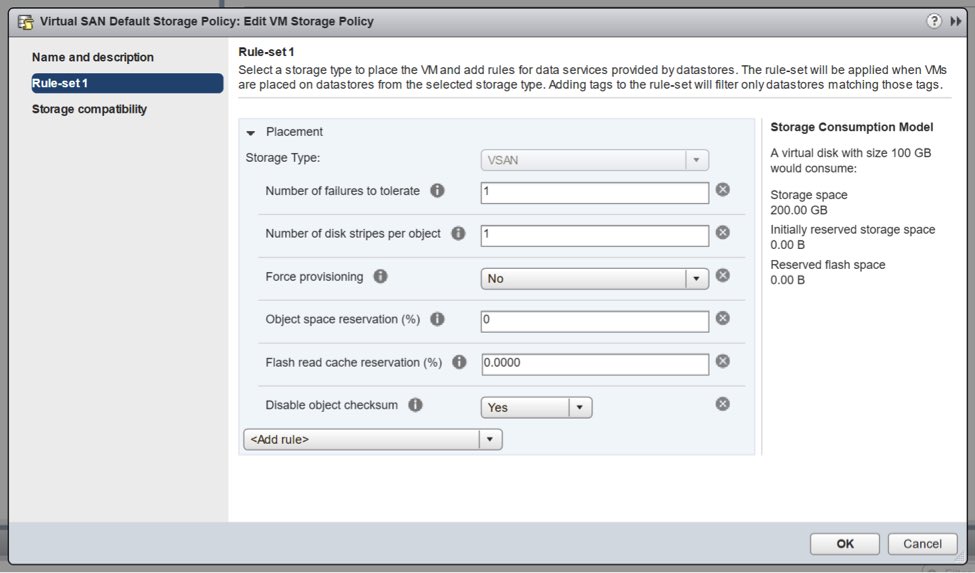
- vSAN 6.2 Introduced a great data reliability feature called Software Checksum. This is an End-to-End Software Checksum within vSAN that uses CRC-32C. It is enabled by default, as it protects against possible issues in the underlying storage medium. If your application already ensures data integrity at this level, this feature can be disabled. To really push vSAN to the breaking point, I have disabled Object Checksum in the Virtual SAN Default Storage Policy.
Conclusion
I hope that sharing these configuration settings, and the reasons I chose each one, helps you understand my performance testing methodology here at the DPL at Western Digital. It took many testing iterations and conversations, with experts here and at VMware, to arrive at this configuration. With any luck, this will help you define your own testbeds and understanding my upcoming performance blogs. I look forward to hearing from you on these settings, or any that you’ve discovered yourself.