

[Tweet “#vsphere UI all-flash #VSAN configuration – which option is right for you? “]
In my previous blog, “New Ways to Configure VMware All-Flash VSAN 6.0”, I explained how to configure all-flash options for VMware’s Virtual SAN. The blog looked at the different ways to configure an all-flash Virtual SAN from the vCenter appliance command line, as well from the ESXi CLI. Both cases required simple command line steps to configure this option because there was no UI option available.
With the vSphere 6.0 U1 release, VMware has now made all-flash Virtual SAN configuration available in the vSphere Web Client UI. In this blog entry, I will show you the UI options and share a few tips.
First UI Option – All-flash VSAN Full Automation with Full Control
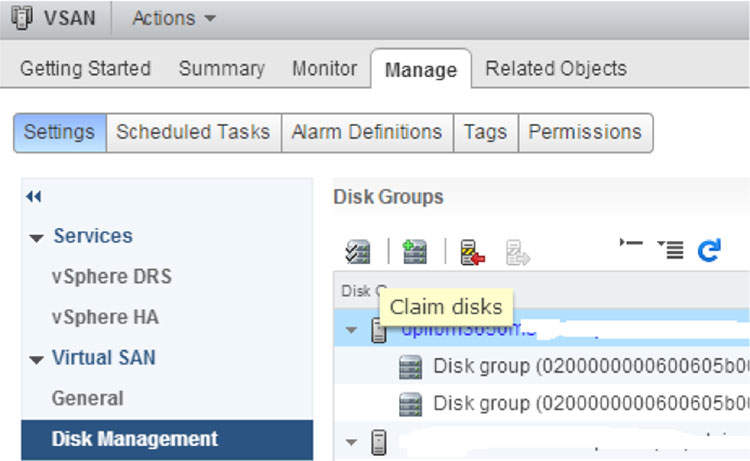
When you enable Virtual SAN, it uses its own algorithm/logic to find the flash drives in each node available in the Virtual SAN cluster and creates a modifiable list. You can then easily select each group by clicking on “claim disks” as shown below:
Once you click on claim disks, local storage devices eligible for a VSAN will appear in the UI as a list of all the available disks in the capacity and cache tiers (Figure 2). My assumption is when we enable Virtual SAN, it looks into each flash drive property and then makes a decision to place it in the cache or capacity tier. As you can see in Figure 2 below, Virtual SAN has placed some of the flash devices in the “capacity tier” and some of them in the “cache tier”. If you expand the list under the “Disk Model/Serial Number” column, you will see all the drives listed which are appropriate for capacity as well as the cache tier.
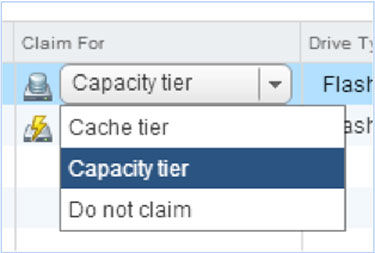
The biggest advantage of the new availability in the UI is the ability to modify the list as you see fit oppose to a static list. You can define which devices to use for capacity and which for cache in your environment. You can also define individual or even multiple drives as shown in Figure 3 from the drop down menu option under the column “Claim For”.
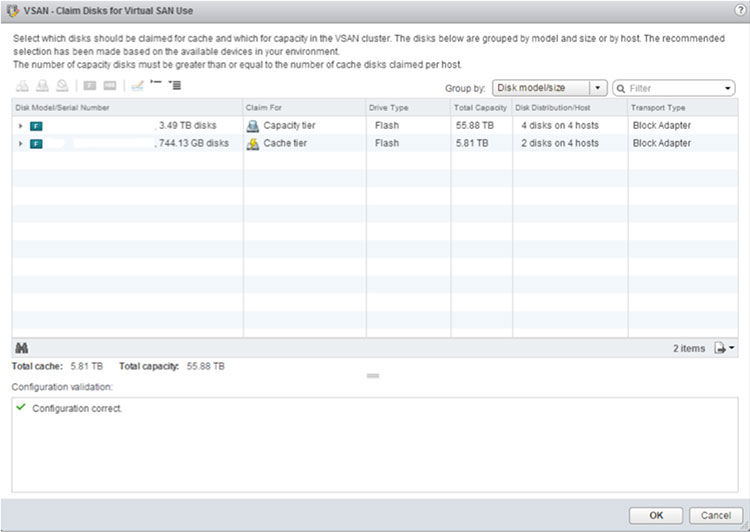
This is truly awesome! It provides tremendous flexibility to administrators during configuration. Once you select the right drives for your tier, you can simply select “OK” and Virtual SAN will do the job for you. It will distribute the cache and capacity drives equally in each disk group per node. You can confirm whether the chosen configuration is correct by looking into the “Configuration Validation” window.
Wait! But what if the person configuring the environment doesn’t know which drive to select? VMware vSphere makes it easy! Just select “claim disk” and then “OK” and Virtual SAN will automatically create the Disk Group and a “vsanDatastore” shared volume for you. This volume is available immediately and right away you can start creating and deploying your VMs on it. There is no longer a need for you to do any manual intervention at the command line. All-flash configurations are now easily configured in an automated fashion. That’s great news and a huge improvement over the previous VSAN release.
You also have the choice to deny any particular disk from being included in the Virtual SAN configuration e.g. if there are HDDs in your system and you do not want to make them part of the Virtual SAN cluster, you can simply choose the “Do not claim” option.More great progress between two minor releases!
Second UI Option – All-Flash VSAN Manual Configuration
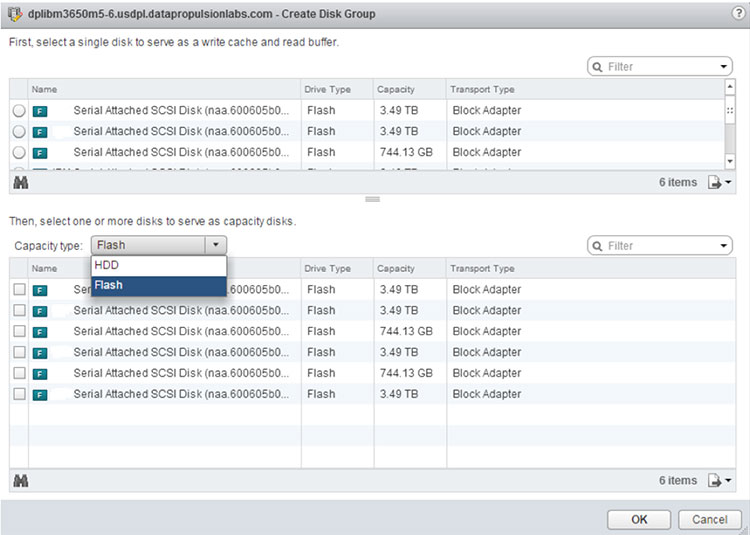
Now that you’ve seen an automated VSAN deployment, I’d like to also show you the traditional, manual way of configuring an all-flash Virtual SAN. Even though it is manual it’s definitely much easier than the previous method of using a command line to configure an all-flash Virtual SAN. That’s right – no more command line! It is so much easier I had to say it twice!
In this method, you go to disk group creation and select a cache drive. From the drop down menu of the capacity tier, choose “HDD” or “Flash” and then select the appropriate number of capacity tier drives to create each disk group manually. You will need to repeat this process for all the nodes and all the disk groups you are creating. Before vSphere 6.0 U1, this drop down option was not available so if you were configuring your flash drives for the capacity tier, you had to use a command line option to have the flash drives appear in the “capacity” list.
So which UI Option Should You Use?
As always, it depends! In my opinion, “claim disks” is the easiest and best option. This can significantly reduce the disk group creation time when dealing with large size all-flash VSAN clusters.
For smaller clusters, or those cases when you want flexiblity, you may think about choosing drives on your own for a particular tier. Once in awhile, flash devices may not appear as expected. For example, in “claim disk” a particular disk might show up in the capacity tier but you would like to use it for the cache tier. In such instances you can use the second, manual option to create your tiers accordingly.
[Tweet “All-flash #VSAN configuration now easier and better than ever! #vsphere”]
Conclusion
All in all, life is now much easier for all-flash Virtual SAN configuration with these UI options. Furthermore, the recently announced Virtual SAN 6.2 supports additional storage data services like deduplication and compression that are enabled only when using all-flash VSAN cluster. I will write about these new options in an upcoming blog.
As always, I can be reached at biswapati.bhattacharjee@sandiskoneblog.wpengine.com or on LinkedIn.