
There are many advantages to using SSDs for the capacity tier in VSAN, specifically with Enterprise-grade SSDs reaching 4TB and beyond and in VSAN 6.0 one will be able to configure a capacity tier using flash drives directly from vCenter web client UI.
However, for those using VSAN 1.0 one needs to configure the SSD drive as if it is an HDD. This is not only a cumbersome and lengthy process, but it is also not a supported configuration.
In this blog I will share several new methods of tagging flash drives in order to make them ready for a capacity tier in current versions of VSAN that make this process much easier. Those evaluating an all-flash VSAN before GA of VSAN 6.0, will find these steps very useful.
All-Flash VSAN Benefits
Before I share a step-by-step explanation of these new tagging methods, I’d like to first discuss why you would want an all-flash VSAN configuration. There are multiple benefits to using SSDs in both cache and capacity tiers, including:
- Provide organizations with the ability to run business critical applications and OLTP databases using VSAN enabled by fast, predicable throughput and lower latency.
- Give customers the ability to scale and support a significantly larger number of VMs and virtual desktops using the same compute and network resources.
- Increase business agility and productivity by enabling IT to provision services faster, increasing user satisfaction and executing on faster backup and disaster recovery for production deployments.
- Combine the benefits of VSAN and flash to deliver a lower TCO using less power, cooling, data center floor space and other resources per virtual machine, virtual desktop or transaction.
- While data de-staging happens from cache to capacity, flushing of data would happen far faster in all-flash VSAN in comparison to a hybrid (HDD + SSD) VSAN, helping define better SLA.
Tagging Flash Drives to the Capacity Tier
First of all, I would like to thank the VMware VSAN Technical Marketing and Performance Engineering team for educating us on this new methodology.
There are many ways to mark flash in order to treat it as “capacity” and I would like to discuss two of them which I found particularly interesting:
- Using vCenter Appliance
- Using vSphere
A. Using vCenter Appliance:
In this method, you ssh to vCenter appliance and start the rvc (Ruby vSphere Console). Once you start the console, you can type the following command to gather the disk information for a particular host:
-
vsan.disks_info ~/computers/<Cluster Name>/hosts/<Host Name>/
This rvc command will display the disks information as shown in below

You need to select the appropriate string for the disks and run the following rvc command e.g. in this case you need to use “SanDisk® LT0800MO”:
-
vsan.host_claim_disks_differently –m <“SanDisk LT0800MO”> -c capacity_flash ~/computers/<Cluster Name>/hosts/<Host(s)* Name>
*If the host name are identical, you can use the wild card to run this one time only to update it all the hosts (nodes) participating in a particular VSAN cluster.
Once you run this command, you are ready to go. Your desired SSD drives are ready for the capacity tier. And you can see them once you log in to the vCenter web client. This is a very fast and quick method rather than tagging each individual SSD as HDD for capacity tier.
B. Using vSphere
If you prefer ESXi, this is another approach to achieve the same objective. This approach may need scripting to make it quicker, otherwise you may need to consider one disk at a time. With more nodes in the VSAN cluster, this will likely be very time consuming.
Once you have all your disks connected to the host and detected by ESXi, you can see the following screen (Fig 1) in vCenter web client (this is same irrespective of whatever approach you choose)
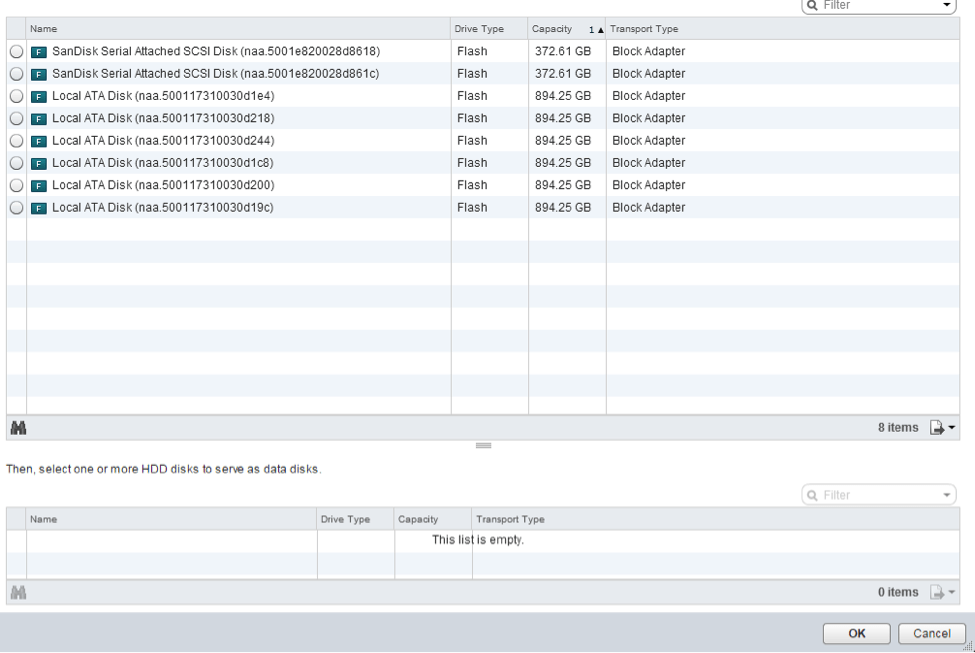
As you can see in Fig 1, all the “Drive Type” is “Flash”, hence, they do not appear in the capacity tier. This prevents us from creating a disk group, so additional steps are required to make some of this disks treated as “Capacity”.
Fig 1 is shows one of the hosts participating in the VSAN cluster. If we log into this ESXi host and execute the following command, we will see the information as shown in Fig 2.
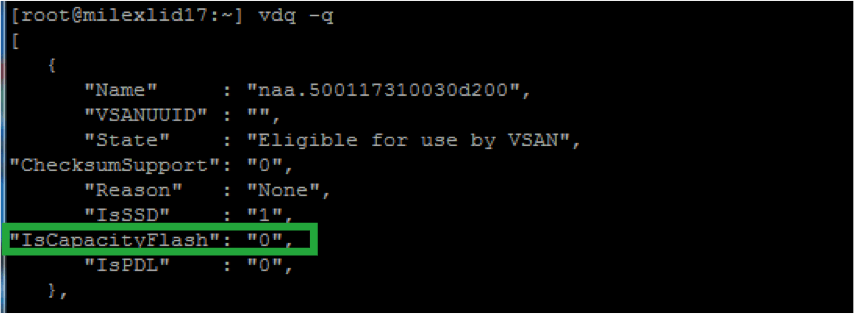
As you can see the parameter is “IsCapacityFlash”:”0” which means by default VSAN does not want to mark any flash device for capacity. It leaves the option up to user to choose which SSD should be tagged as a capacity tier. The command “vdq –q” will list out all the devices available in the host, but for simplicity I am listing only one of the devices in Fig 2.
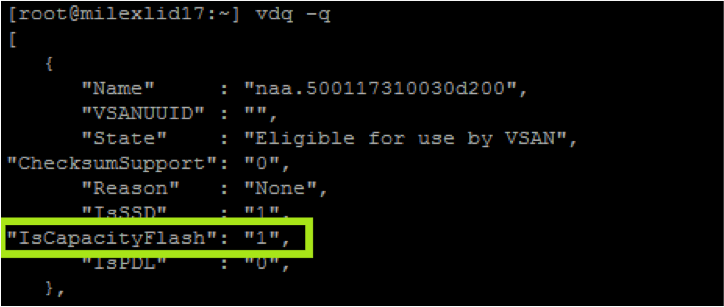
The next step is to execute the following commands:
Once you execute the commands in Fig3, you can rerun the command in Fig2, and find that the value of “IsCapacityFlash”: is converted to “1” from “0”. That means this SSD is marked and ready to be used as a capacity tier (Fig 4).
Once you log into vCenter and go to Disk Group creation window, you will see following screen (Fig 5).
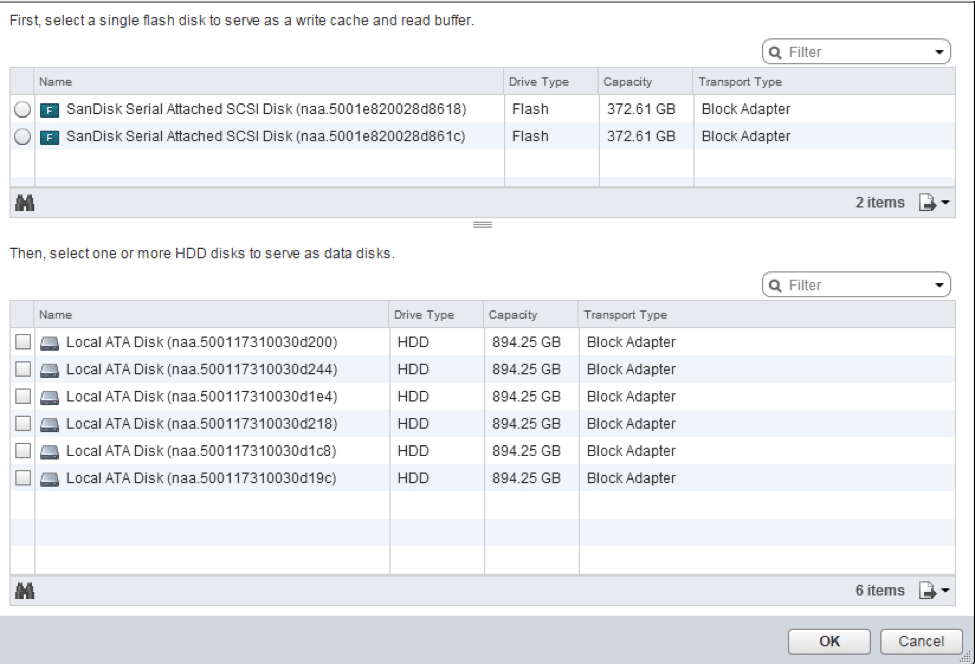
Now you can create the disk group as you wish. In my case, I am planning to create 2 disk groups, so I converted 6 of them for capacity tier and left 2 in cache tier (Fig 5).
As I mentioned earlier, if you would need to do this one disk at a time, this would be really lengthy process. Rather, by preparing a small script e.g. by grabbing the devices using “esxcfg-scsidevs –c” and executing the commands in Fig 3 as part of the script to tag all the desired disks, this will be a far quicker approach.
Conclusion
For those of you who are evaluating all-flash VSAN now, before the availability of VSAN 6.0, I hope you find the above methods and tips useful when you build your all-flash VSAN systems. If you’d like to learn more about SanDisk all-flash VSAN 6.0 configuration and testing results, read my latest blog: How We Achieved 2 Million Transactions With All-Flash VSAN 6.0.
If you have any questions, you can reach me at biswapati.bhattacharjee@sandiskoneblog.wpengine.com, or join the conversation on Twitter with @SanDiskDataCtr
Acknowledgement
I would like to thank Rawlinson Rivera, Sr. Technical Marketing Architect, and Lenin Singaravelu, Sr. Performance Engineer at VMware in educating and sharing this valuable information with us on creating all-flash capacity tier using SSDs.